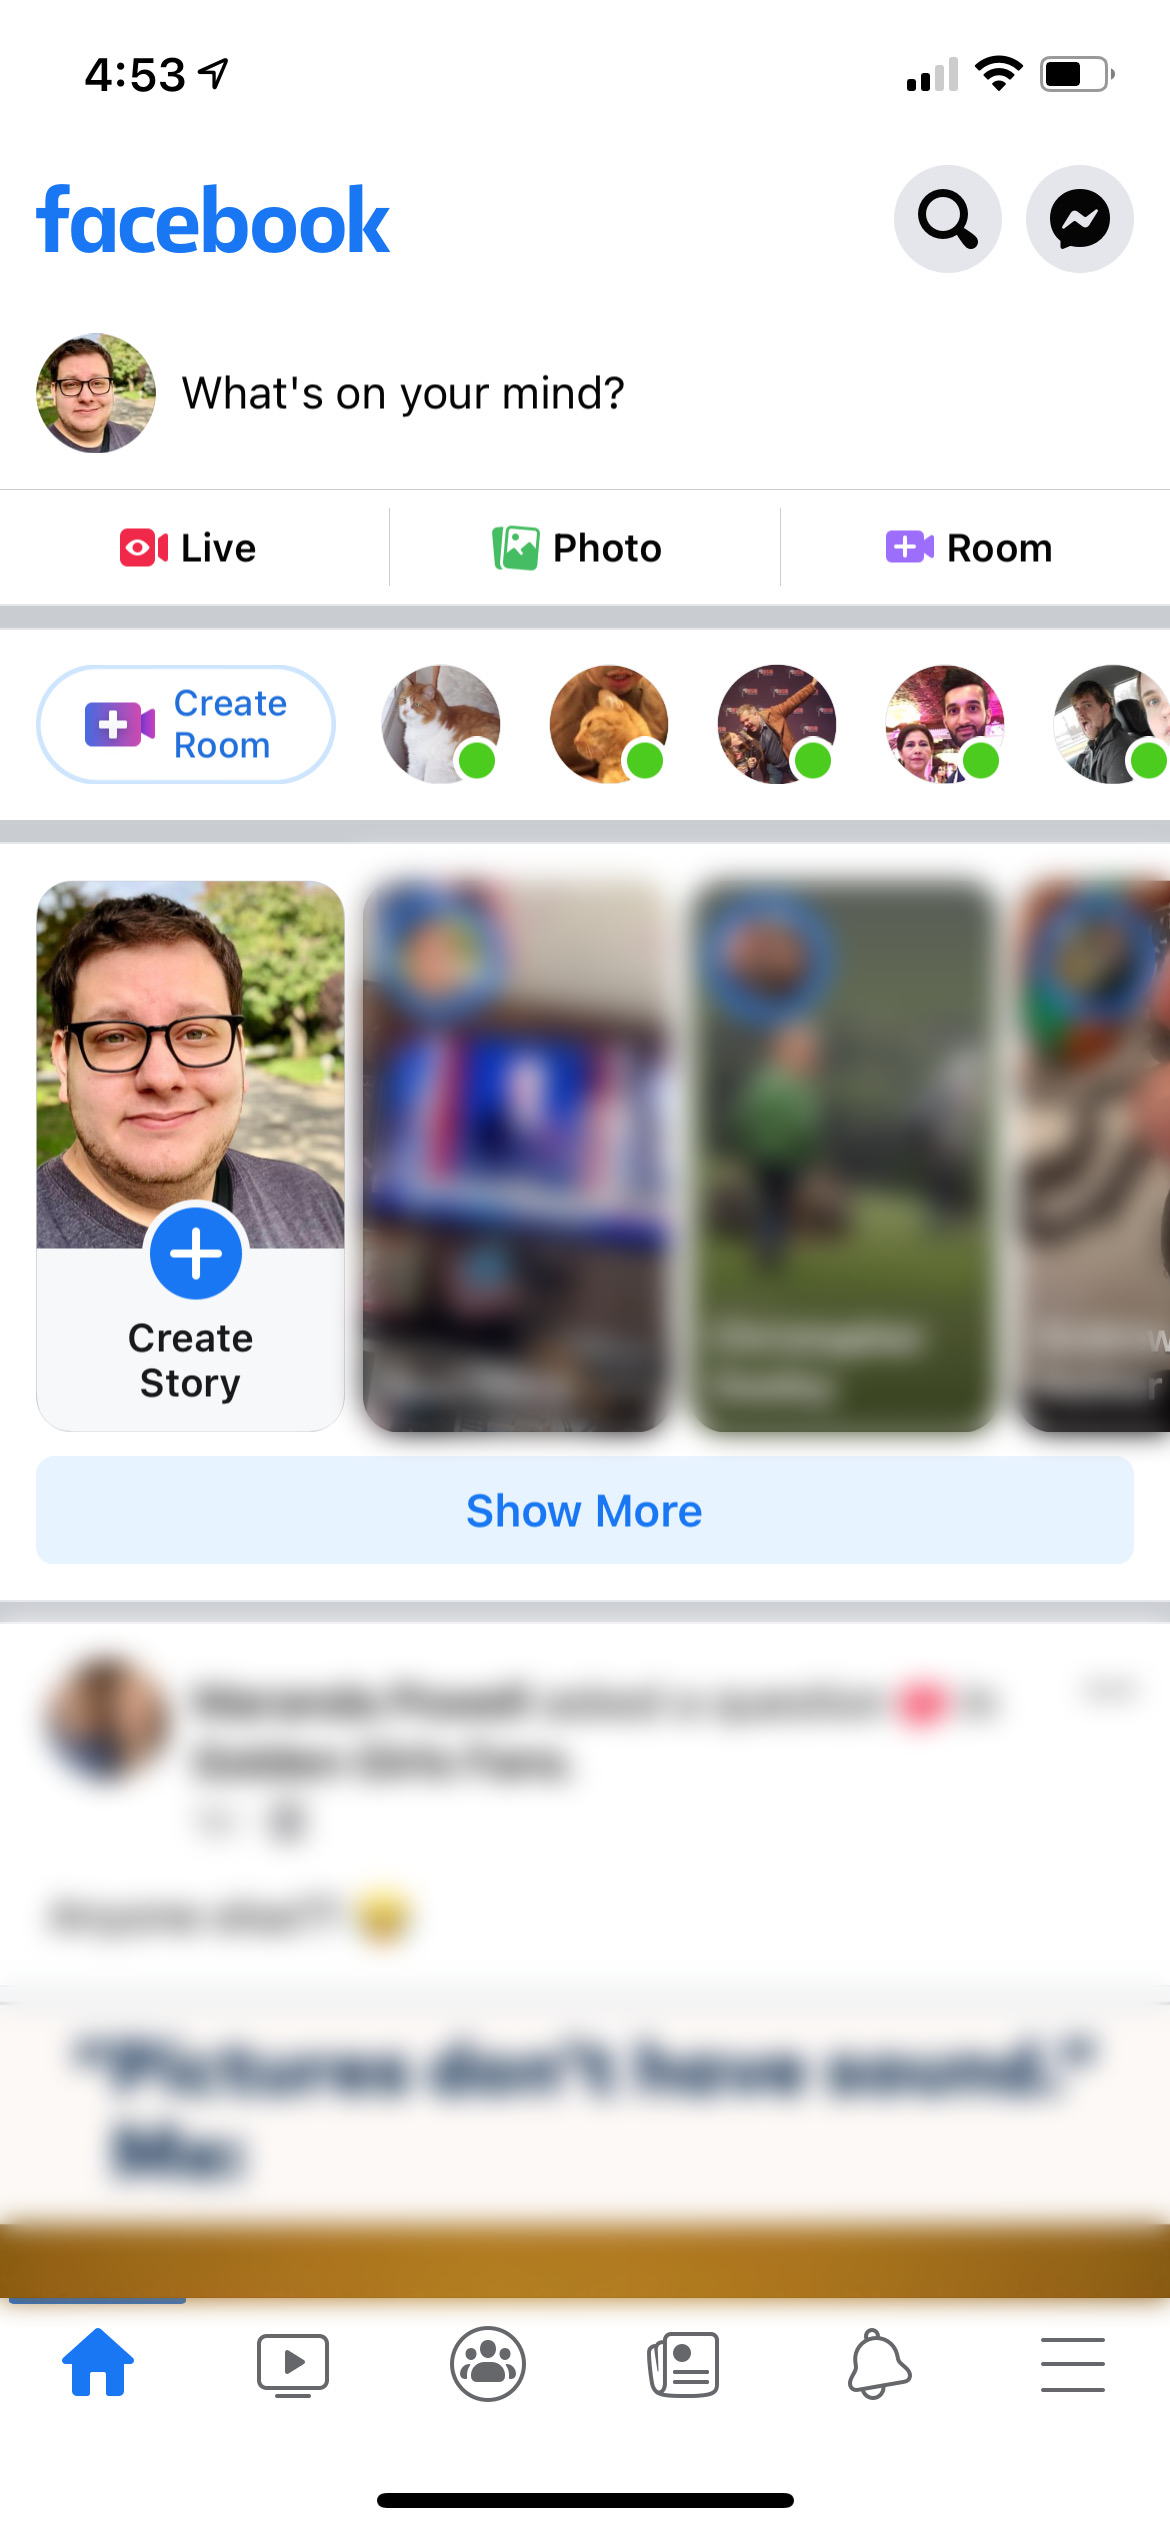
It would appear that nearly every social network has released a ‘stories’ feature, allowing users to post snippets of their lives that disappear after a set time, such as 24 hours. Similar to the feature found within Instagram, Twitter, and Snapchat, Facebook Stories lives at the top of your feed as a series of circles; click on one to see content posted from your friends and family. Stories aren’t published to your profile forever; instead, they self-destruct, making them a great way to post thoughts and memories that you don’t need to live on forever.
To learn more about using Facebook Stories, keep reading and become a social media pro. Just remember that while Facebook Stories disappear after 24 hours, anyone could screenshot the contents, so don’t post anything that you wouldn’t want the entire world to see. Check out our guide if you’re concerned about other Facebook privacy settings.
Posting a Facebook Story (iOS/Android)
The best way to post a Facebook Story is to do so from your smartphone or tablet that run either iOS or Android. To begin posting a story, users need to open the Facebook app. For detailed instructions, follow our steps below:
Step 1: With Facebook opened, ensure you are on the first tab, also known as the Home tab; you can check which tab is selected at the bottom of your screen.
Step 2: At the top of your feed, there will be a collection of other Facebook Stories as well as a button that says Create Story — click the button to create your post.
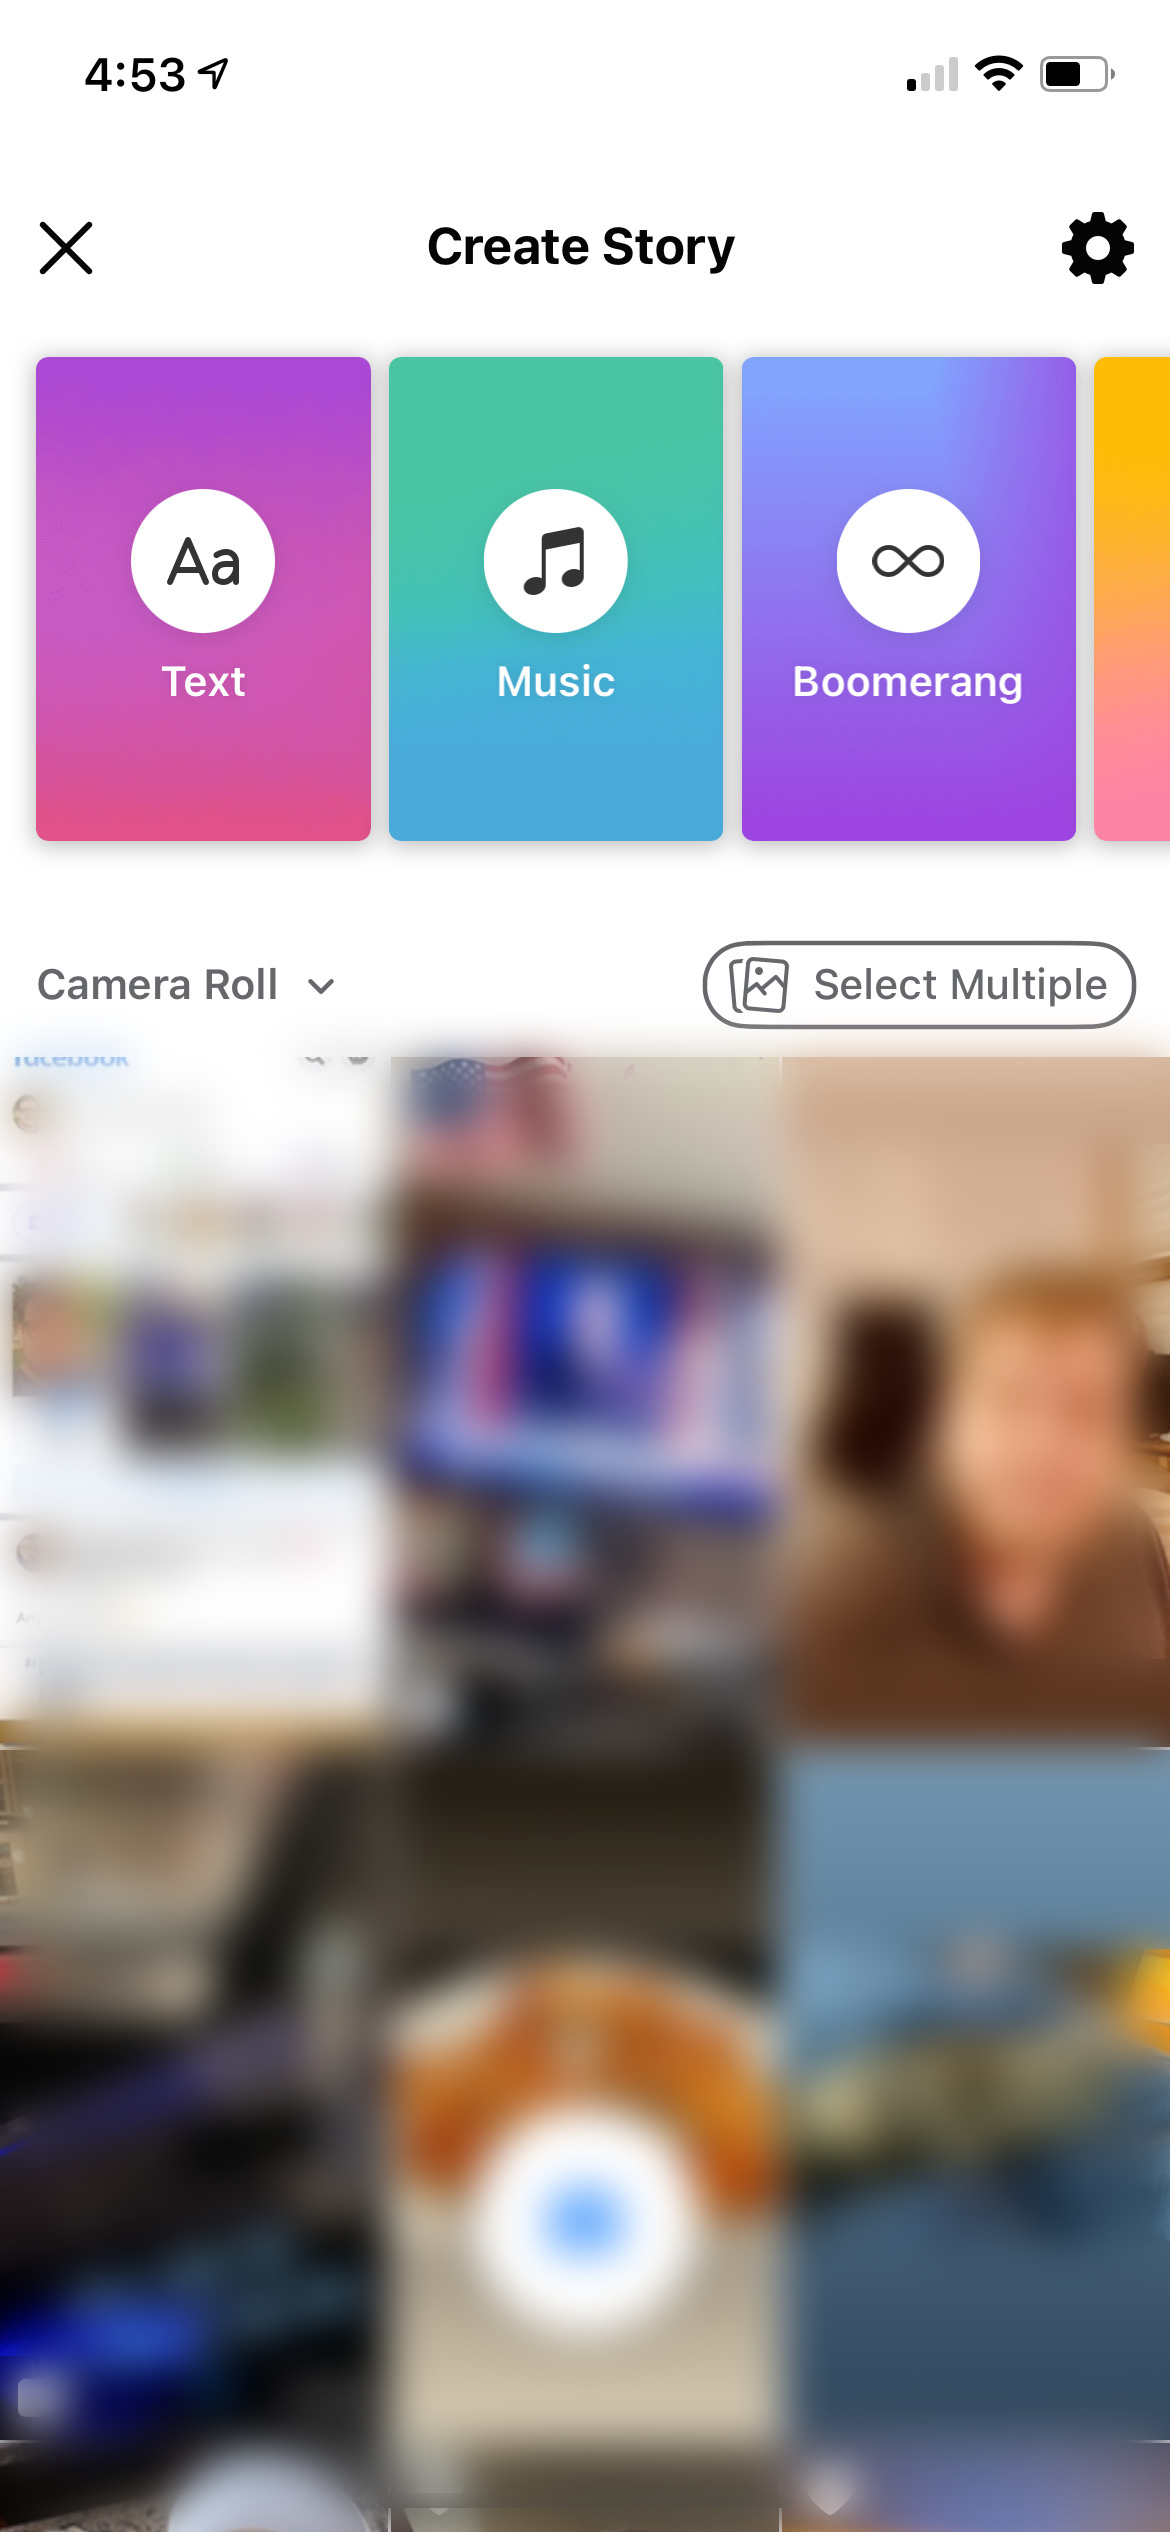
Step 3: On the Create Story screen, you will be given the option to craft several different types of stories; follow the sections below for the kind of Facebook Story you wish to create.
Photo or Video Story
A Photo or Video Story will allow you to post a piece of media from your camera roll.
Step 4: On the Create Story screen, your smartphone or tablet’s camera roll will be displayed on the lower half of the screen. Click on the piece of media you wish to post.
Step 5: In the upper-right corner of the screen, use the Stickers, Text, Draw, and Animate options to customize your post.
Step 6: If desired, press the Tag People button to tag friends and family in your post.
Step 7: When finished, press the Share to Story button.
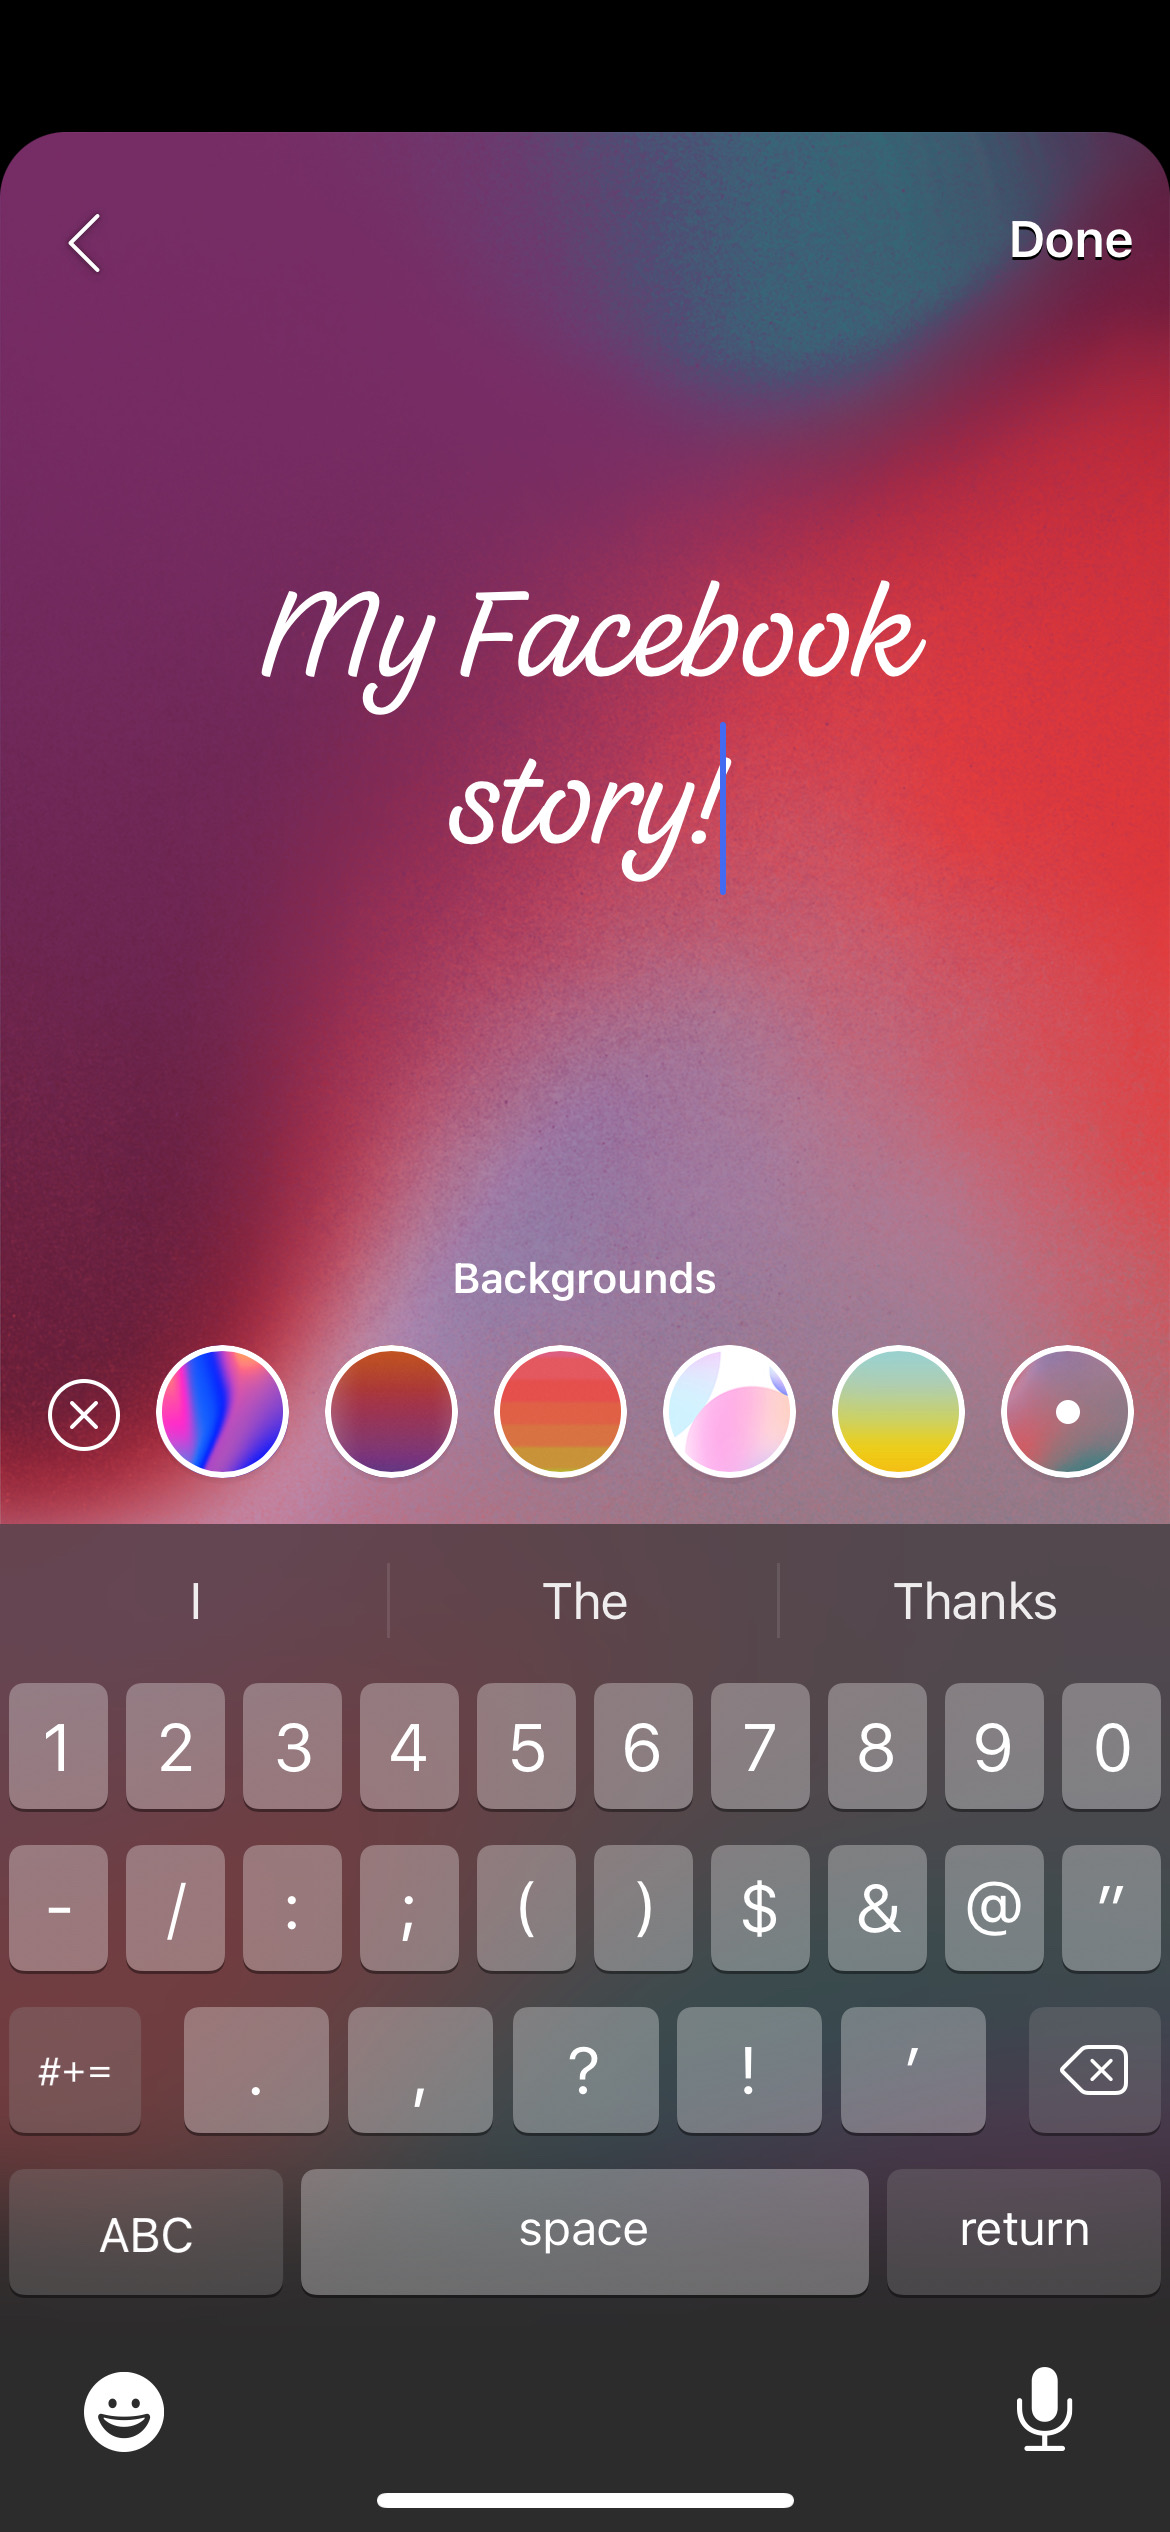
Text Story
A Text Story allows you to post a block of customizable text.
Step 4: On the Create Story screen, select the Text button at the top of your screen.
Step 5: Use your device’s keyboard to type out any text you wish to share.
Step 6: Click the circular button near the bottom of the text and select a background you wish to use. Once selected, press the (X) button to close the background selector.
Step 7: If you wish to change the text style, click the style button found to the right of the circular button. With each click, your text will change to a different type.
Step 8: Once finished, press the Done button, then click Share to Story.
Music Story
A Music Story allows you to post a portion of a song along with lyrics.
Step 4: On the Create Story screen, select the Music button at the top of your screen.
Step 5: Tap on the song you wish to use; if not shown, use the Search Music bar at the top of the screen to seek out a specific selection.
Step 6: Once your music is selected, you can choose to use a photo or video from your camera roll as your background. If you wish to use a generic background, swipe down to dismiss the image/video selector.
Step 7: Click on the lyrics to customize them. When clicked, you can scroll back and forth within your song to find the portion you wish to play. Additionally, you can use the buttons above the song scroller to select the style of the lyrics. When finished, click the Done button in the upper-right corner.
Step 8: In the upper-right corner of the screen, use the Stickers, Text, and Draw buttons to customize your post.
Step 9: Select the Beat Style, or disable it altogether, using the buttons at the bottom of the post. Options include Circle, Heart, and Square.
Step 10: Once finished, click Share to Story.

Boomerang Story
A Boomerang Story allows you to post a short video clip that automatically rewinds and fast forwards itself when played back.
Step 4: On the Create Story screen, select the Boomerang button at the top of your screen.
Step 5: If desired, select an effect at the bottom of the screen.
Step 6: Hold down the circular button in the bottom-center of the screen to record; release it when you are finished — you will have a limited amount of time.
Step 7: In the upper-right corner of the screen, use the Stickers, Text, Draw, and Animate options to customize your post.
Step 8: If desired, press the Tag People button to tag friends and family in your post.
Step 9: When finished, press the Share to Story button.
Mood Story
The Mood Story allows you to post a GIF.
Step 4: On the Create Story screen, select the Mood button at the top of your screen.
Step 5: Tap on the GIF you wish to use; if not shown, use the Search GIFs bar at the top of the screen to seek a specific choice.
Step 6: Tap on the GIF if you wish to change the framing style.
Step 7: In the upper-right corner of the screen, use the Stickers, Text, and Draw buttons to customize your post.
Step 8: When finished, press the Share to Story button.
Selfie Story
The Selfie Story allows you to directly post a photo or video from your front-facing or rear-facing camera.
Step 4: On the Create Story screen, select the Selfie button at the top of your screen.
Step 5: If desired, select a filter at the bottom of the screen.
Step 6: Hold down the circular button in the screen’s bottom-center to record or tap it once to take a photo. For videos, release it when you are finished — you will have a limited amount of time.
Step 7: In the upper-right corner of the screen, use the Stickers, Text, Draw, and Animate options to customize your post.
Step 8: If desired, press the Tag People button to tag friends and family in your post.
Step 9: When finished, press the Share to Story button.
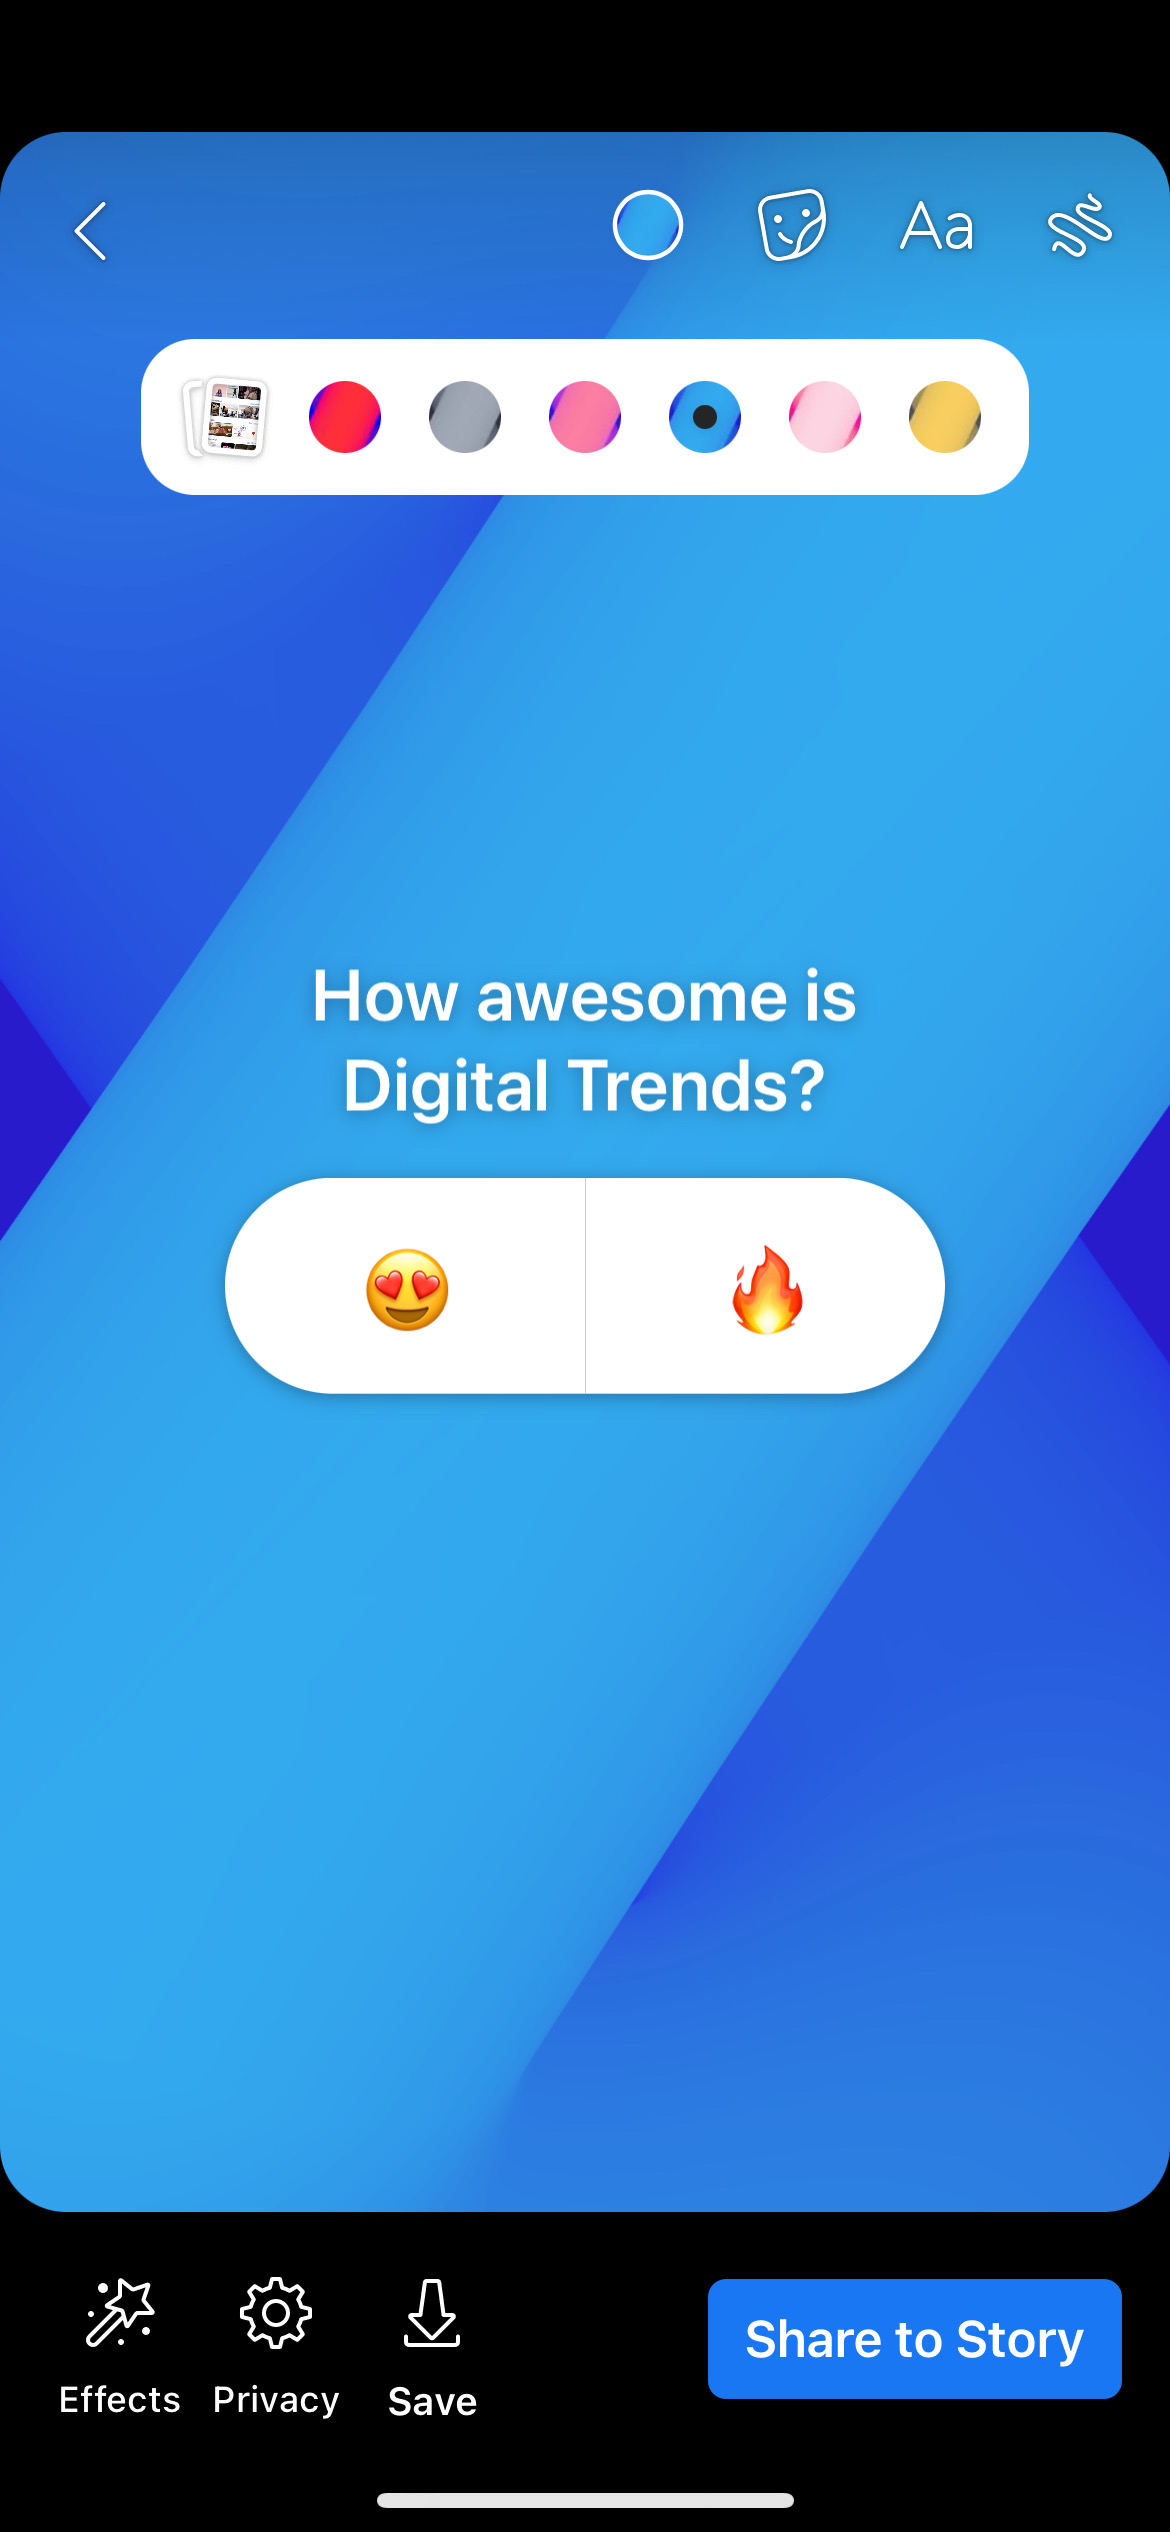
Poll Story
The Poll Story allows you to ask your friends on Facebook a question and have them respond with one of two answers.
Step 4: On the Create Story screen, select the Poll button at the top of your screen.
Step 5: Using your keyboard, enter the question you wish to ask.
Step 6: Tap on the Yes or No option to modify it; when selected, use your keyboard to enter a new choice. If you do not change these options, they will remain as Yes and No.
Step 7: Use the Background Selector at the top of the screen to choose a background.
Step 8: In the upper-right corner of the screen, use the Stickers, Text, and Draw buttons to customize your post.
Step 9: When finished, press the Share to Story button.
Posting a Facebook Story (Web Browser)

Another way to post a Facebook Story is to do so from within your web browser. The Facebook website is limited, however, and can only post either photo or text story. If you wish to do so, follow these steps from within your favorite web browser:
Step 1: Visit Facebook.com and login to your account.
Step 2: At the top of your News Feed, where your friend’s Stories are displayed, click on the Create Story button.
Step 3: Click either Create a Photo Story or Create a Text Story, then follow the step below for the type of Facebook Story you wish to create.
Photo Story
A Photo Story will allow you to post a photograph or image from your device.
Step 4: If you select Create a Photo Story, you will be asked to choose a photo from your device to post.
Step 5: Once chosen, you can click on the photo to crop or rotate it using your mouse.
Step 6: If you wish to add text to your photo, click the Add Text button on the left side of the webpage, then begin typing. Using the pop-up box, you can change the text font or alter the color.
Step 7: When finished, press the Share to Story button.
Text Story
A text story allows you to post a block of customizable text.
Step 4: On the left side of the webpage, type your text within the Text box.
Step 5: If desired, select the background and font type.
Step 7: When finished, press the Share to Story button.