

Introduction: Arduino Synthesizer With FM


It is quite possible to create decent sound with an Arduino as has been demonstrated in plenty of other projects, for example:
Here is another demonstration of how a common Arduino Uno (or clone) can be used to generate a wide range of musical sounds.
The specs are as follows:
- 31kHz sampling rate
- 9-bit resolution
- 4-fold polyphony (4 different tones can play simulateneously)
- FM-synthesis with time-varying modulation amplitude
- ADSR envelopes
- 12 preset instruments
- 18 keys covering 1.5 octave
Watch and listen to the video for a demo!
Of course it's nowhere close to the commercially digital synthesizers, but it's a big step from a simple 'beep' piano.
Instruments are defined by a set of 10 parameters, and it's easy to create new sounds by changing the parameters. After playing around a bit I found came up with 12 instruments that sound good and named them as follows:
- piano
- xylophone
- guitar
- cymbal
- bell
- funky
- vibrato
- metal
- violin
- bass
- trumpet
- harmonica
Please tell me in the feedback if you find new good sounds, then I can add them to the code.
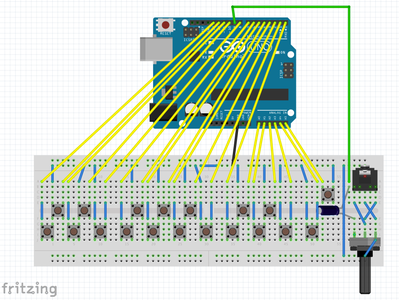
The project described has the 19-button keyboard built with microbuttons on breadboard, but it lends itself perfectly to be built into existing objects, like furniture, toys or vintage equipment.
Step 1: Construction and Operation

Required materials
- an Arduino Uno or clone
- an 830-hole breadboard
- 19 4-pin micro-push buttons
- a 100muF electrolytic capacitor
- a 10kOhm potentiometer
- a 3.5 mm headphone jack
- ~50cm of single core hookup wire
- 21 jumper wires (14 long and 7 short)
Wire up all the components according to the indicated schematic. It's quite some work to get all the wiring in place, so it makes sense to start with connecting only the audio circuit and one button, and upload the software. If that works you can progressively add all the other buttons. For the electrolytic capacitor, make sure to connect the positive terminal to the Arduino side and the negative terminal to the potentiometer. The short connections within the breadboard are best done with short pieces of solid-core hookup wire, the longer connections to the Arduino better with flexible jumper wires.
Note that the buttons may be connected to any pin, with software it is possible to assign any key to any note. The only exception is pin D9, on which the audio signal is produced, it must not be used as a key input.
Load up the Arduino sketch from the next step and you can start playing.
The keys play the notes C4-F5, and the rightmost button changes the instrument. The time that a button is pushed changes the length of a note, but since these are simple digital pushbuttons, the loudness of the tone cannot be influenced by speed or force with which the keys are pushed.
Connect a stereo headphones to the 3.5 mm jack and with the potentiometer the volume can be regulated.
To hear the sound over a speaker, it needs to be amplified. Any amplifier that is designed to take headphone input will work. Alternatively a cheap amplifier module base on the LM386 or PAM8403 should be sufficient to bring up the volume.
Attachments

Step 2: Code
Upload the attached with the Arduino IDE. I used version 1.8.7, but nothing fancy has been used so I expect it to work well with most past and future IDE's. Moreover, no external libraries are used.
After the 'Verify' step, I see:
Sketch uses 11630 bytes (36%) of program storage space. Maximum is 32256 bytes. Global variables use 757 bytes (36%) of dynamic memory, leaving 1291 bytes for local variables. Maximum is 2048 bytes.
So it is far from exhausting the 2kB RAM, 32kB flash of the Arduino Uno.
Instrument definitions
Each instrument is defined by 10 parameters. To discover new sounds, it's crucial to understand their meaning, and make sure you understand the basics of ADSR envelopes and FM sound synthesis .
ldness: loudness
Keeping this at 64 or below guarantees that the output does not go in overflow and produce horrible distortions. But for sounds that remain only very shortly at maximum amplitude, it's OK to go higher, since it's unlikely to have all 4 voices at maximum amplitude.
pitch0: pitch offset
Setting this to 12 results in 'normal' configuration where the leftmost key has the pitch of the C4. Setting it to 0 results in a shift of a full octave down, while the value 24 results in a full octave up.
ADSR_a: attack parameter
Speed with which the tone rises from 0 to max. A small number here means the sound starts very slowly. Example: ADSR_a=8192 takes 4ms to rise to max. ADSR_a=256 takes 128ms to rise to max
ADSR_d: decay parameter
Speed with which the tone decays from max to sustain. A small number here means the sound decays very slowly. Example: ADSR_d=8192 takes 4ms to decay from max to 0 . ADSR_d=256 takes 128ms to decay from max to 0. If sustain is different from 0, it actually takes less to reach the sustain value.
ADSR_s: sustain parameter
Relative loudness of the tone if the key remains pushed. ADSR_s=255 means it sustains at maximum volume. ADSR_s=192 means it sustains at 80% of the maximum volume. ADSR_s=0 means the sound dies off even if the key stays pressed.
ADSR_r: release parameter
Speed with which the tone decays after being released. A small number here means the sound continues for a long time after key release Example: ADSR_r=8192 takes 4ms to decay from max to 0 . ADSR_r=256 takes 128ms to decay from max to 0. If the tone was already below maximum at the moment of release, it takes less time to die.
FM_inc: FM frequency wrt pitch
The ratio of the modulation frequency to the pitch FM_inc=256 corresponds to a modulation frequency equal to the pitch, resulting in pure harmonics that are multiples of the pitch frequency. FM_inc=512, 768 or 1024 corresponds to a modulation frequency 2,3 or 4 times the pitch, resulting in pure harmonics that are multiples of the pitch frequency, but with more emphasis at the higher frequencies. FM_inc=128 corresponds to a modulation frequency half to the tone, resulting in semi-pure harmonics that are multiples of the half the pitch frequency, thus creating also undertones. FM_inc=384,640,896 corresponds to a modulation frequency 1.5, 2.5 or 3.,5 times the pitch, resulting in semi-pure harmonics that are multiples of the half the pitch frequency, thus creating also undertones, but with more emphasis at the higher frequencies. Any number for FM_inc that is not a multiple of 64 will result in anharmonic tone, typical of cylindrical vibrations. A value of FM-inc that differs slightly from a multiple of 256 will result in very nearby-frequency bands, which then results in a vibrato effect.
FM_a1: FM amplitude start
Frequency modulation amplitude at the beginning of a note. FM_a1=256 means that at the beginning of a note beta=1, resulting in a rich spectrum. A smaller number results in fewer sidebands and thus a purer note. Very large values, like FM_a1=2048 corresponds to beta=8 and gives rather crazy waveforms, which may result in quite interesting sounds.
FM_a2: FM amplitude end
Frequency modulation amplitude at the end of a note. In most instruments the high frequencies damp faster than the low frequencies, which can be emulated by a decreasing value of the FM amplitude, or FM_a2FM_a1 can help to create weird crazy funky sounds.
FM_dec: FM decay
The speed with which the FM amplitude changes from its starting value to its end value is determined by Fm_dec. Note that this change follows an exponential decay, so the transition is much smoother than for the ADSR envelope, where the transition is linear. FM_dec=256 means that the time constant of the exponential change is 128ms. A low value of FM_dec means that the sound keeps changing continuously. A high value of FM_dec results in a short initial burst of change, followed by a quick transition to a more stable final sound.
Keys
The Arduino uno has 20 io ports. Pin 9 is needed for audio out and one more pin for instrument select. Apart from that, any key can be connected to any i/o pin, and the corresponding note defined in software. For speed reasons, the keys are accessed though direct port manipulation. Thus, inside the code they are accessed as PORTD, PORTB and PORTC. However, in the block 'pin to key mapping', the comments in the code indicate which bit of which port correspond to which Arduino pin. If you make a version with fewer keys, you can define the uninstrumented pins here as 'nokey': it results in smaller and faster code and avoids unwanted tone generations if any of these keys accidentally gets shorted to ground. All keys use the internal pull-up resistors, thus avoiding the need for an extra 19 external pull-up resistors. The keys are read only once every loop (once every 0.48ms), so the effects of debounce are quite limited as well, and I found no need for hard- or software debounce protections.
Attachments

Step 3: Technical Details
PWM
Pulse-width modulation is a well-known method to create semi-analog signals. For creating audio, it must be done with a frequency well above our hearing limit. The timer is set up to give a pulse every 512 clock cycles. Since the Arduino runs at 16MHz, this corresponds to a sampling frequency of 31250Hz, well above our hearing limit. This sampling frequency allows to produce sounds of up to half that frequency (according to the Nyquist theorem).
Timing without interrupts
One method to keep track of time and update the pulse width at the right moment is to use interrupts. However, interrupts have a significant overhead, so I chose instead to base the timing on checking the timer overflow bit. This way the available CPU time is divided more or less equally between the 'fast loop' and the 'slow loop'.
In the fast loop (setPWM) the pulse width is calculated for the 4 voices, at every tick of the timer. This is allowed to take up ~250 cycles, and it appears sufficient to update the 4 phases, do the frequency modulation, calculate the intensity and add up the 4 signals. To keep this fast, only 8- and 16-bit integer numbers are being used, and the sine values have been tabulated.
The call to fast loop is forced to be an inline functions, using the __attribute__((always_inline)) attribute. This means that the assembly code that is generated by the compiler repeats this piece of code every time that it is called. It takes up more space, but it is faster.
There is no time in 512 clock cycles to perform all other functions, such as checking the buttons, changing the instrument, choosing the voice, and modifying the time-evolution of the notes, so this functionality gets split up into 15 pieces and is interspersed between the fast loops. This allows to do some intermediate calculations with 32-bit precision, needed for the multiplication of two 16-bit numbers. The full loop takes 0.48 ms which fast enough for these functions.
FM synthesis
A simple sine wave sounds dull since it has no higher harmonics. A computationally efficient way to create complex sounds is frequency modulation. For practical reasons, it is implemented as phase modulation here, but for sinusoidal signals phase modulation and frequency modulation are equivalent. FM can produce a rich spectrum of sidebands next to the main pitch. The modulation frequency determines the position of these sidebands, and the amplitude determines their intensity. If the modulation frequency is not a simple ratio of the pitch, the resulting sound is anharmonic, and corresponds to the typical sound of vibrating cylindrical objects, such as a bell. Real musical instruments have a rich spectrum that varies over time, since some vibrations damp faster than others.

Participated in the
Remix Contest


