
CycleKart Tech Forum
Our Friend Warpage
Posted by Wikispeeder


|
Wikispeeder
Bruce C
|
Topic Creator (OP)
Aug 13, 2018 07:42 AM
Joined 7 years ago
170 Posts
|
Despite my best efforts (everything clamped down to a fare-thee-well to a Certiflat table, multiple measurements, tack welding and rechecking, stitch and backwelding, etc) I seem to have a warp in my frame. It has a wind or twist of about 1/4 inch as it goes to the front. Now, as CKs are pretty flexy anyhow and the suspensions are more notional, is this something I can ignore, or should I get out the sawzall and undo some of the bracing and take the chance of making a dog's breakfast of the whole thing? To say I'm bugged would be an understatement!
-Bruce
- Bruce
"Personally I'm always ready to learn, although I do not always like being taught." - Winston Churchill
-Bruce
- Bruce
"Personally I'm always ready to learn, although I do not always like being taught." - Winston Churchill
 Oak HArbor, WA, USA
Sign in to contact
|
Aug 13, 2018 09:31 AM
Top Contributor
Joined 7 years ago
537 Posts
|
got any pics of the chassis, id be curious to see it. how much bracing do you have? Personally, I wouldnt worry about too much. both chassis ive made arent exactly precise and the one that has been driven has been fine.
"Magic Man"
Doin It Wrong
1908 Stanley Gentlemen's Speedy Roadster
1927 Nash Legion
"Magic Man"
Doin It Wrong
1908 Stanley Gentlemen's Speedy Roadster
1927 Nash Legion
|
Wikispeeder
Bruce C
|
Topic Creator (OP)
Aug 13, 2018 10:55 AM
Joined 7 years ago
170 Posts
|
In reply to # 34729 by JTremain
got any pics of the chassis, id be curious to see it. how much bracing do you have? Personally, I wouldnt worry about too much. both chassis ive made arent exactly precise and the one that has been driven has been fine.
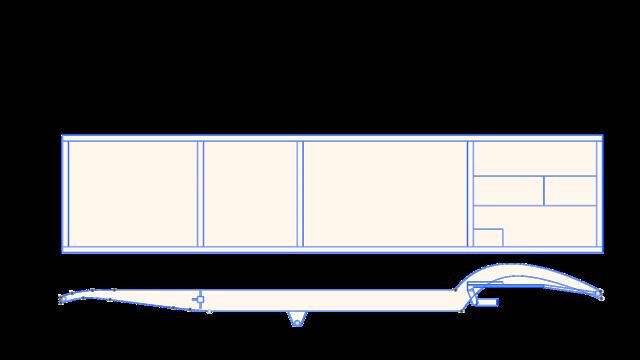
Here's a not-to-scale sketch of the layout. The rear area of the frame is very stout with the current bracing, and appears to be straight and square. The problem looks to be about midway or so, possibly starting as far back as the connection of the straight rail to the rear arch. It's as if one rail got slightly lifted at the front. It was fine when I tacked in the tubing at the extremities, so it's one of the mid braces, maybe. One is easy to remove and replace, the other, not so much.
The rail steel seemed to have a LOT of residual stresses in it, and when I cut off edges to make the front taper, it twisted all over. Maybe my welding allowed some of that stress to manifest itself somehow. It's really strange and it's the first time I've had this kind of warping problem with a simple tube structure like this. I certainly took precautions, but that's how it goes sometimes! If I only had a large kiln, I could just heat the whole thing red hot and give it a tweak ...

- Bruce
"Personally I'm always ready to learn, although I do not always like being taught." - Winston Churchill
Edited 1 time(s). Last edit at 2018-08-13 10:56 AM by Wikispeeder.
Attachments:
Frame_NOT_TO_SCALE.jpg 12.2 KB
 Cape Coral, FL, USA
Sign in to contact
1900 Ford Model 01 "Quadricycle"
1908 CycleKart Vintage "Lizzy" 1908 Harley-Davidson Pre-War 1935 CycleKart Speedway Racer & more |
Aug 13, 2018 10:58 AM
Top Contributor
Joined 6 years ago
1,165 Posts
|
The only effect this will have on a cycle kart chassis is one front tire might carry a bit more load than the other one. Chances are good that you would never notice it, but if you're concerned, you could scale the kart when it's done, and adjust the load on the front tires with shims between your spring and axle. I assume you're using leaf springs on the front.
|
Wikispeeder
Bruce C
|
Topic Creator (OP)
Aug 13, 2018 12:21 PM
Joined 7 years ago
170 Posts
|
In reply to # 34731 by 1908Rick
The only effect this will have on a cycle kart chassis is one front tire might carry a bit more load than the other one. Chances are good that you would never notice it, but if you're concerned, you could scale the kart when it's done, and adjust the load on the front tires with shims between your spring and axle. I assume you're using leaf springs on the front.
That's good to know. I didn't think it would make much difference with the kind of suspension we work with (and yes, leaf springs in the front on mine). I'm trying to console myself by saying "vintage Italian cars were *all* asymmetric.
- Bruce
"Personally I'm always ready to learn, although I do not always like being taught." - Winston Churchill
|
Oak HArbor, WA, USA
Sign in to contact
|
Aug 13, 2018 04:55 PM
Top Contributor
Joined 7 years ago
537 Posts
|
I dont have much more bracing than that and when you start tying the body and 'tub" into the chassis, itll strengthen things up some more. I had to start adjusting how I was mount steering/suspension components to get it all square lol
"I'm trying to console myself by saying "vintage Italian cars were *all* asymmetric." LOVE IT!
"Magic Man"
Doin It Wrong
1908 Stanley Gentlemen's Speedy Roadster
1927 Nash Legion
"I'm trying to console myself by saying "vintage Italian cars were *all* asymmetric."
LOVE IT!"Magic Man"
Doin It Wrong
1908 Stanley Gentlemen's Speedy Roadster
1927 Nash Legion

|
Wikispeeder
Bruce C
|
Topic Creator (OP)
Aug 14, 2018 12:29 PM
Joined 7 years ago
170 Posts
|
Thank you all, gentlemen, for your input. It's much appreciated.
After sleeping on it and letting the situation roll around in the back of my head (ok, fester in the back of my head), it became apparent to me that I simply have too much Scots and German blood in me to leave things as they are. I mean to say, do any of *you* have a voice in your head that says things like, "Vat you mean, chust leave it und nobody vill know? *I* vood know, und *Gott* would know, und zat iz two people too many!". There are just some times when a bit of extra work will reduce internal strife, you know?
So, this morning I made more measurements, wrote things down, and pulled out the power hacksaw. At least I had the good grace not to mutter, "Hold my beer, watch this", although it felt a lot like one of those portentous moments.
The 2nd crossbrace from the front was one of those bright Ideas you get that turns out to be not-so-bright. I'd used a 1 inch square tube for lightness and added gussets to help it resist any frame twist. All those corner welds on the little gussets were a pain royale! The welds were solid but looked pretty awful. I'd told myself that nobody would see them anyway (see voice-in-head above for response). When I made the first cut, there was a lot of pent up tension on that brace that got released! POP! It sprung apart a lot more than I was expecting, and that right there told me I was doing the Right Thing. Ground off the remaining bits to receive the new 1X3 crossbrace that will go in later this afternoon.
I also had the front brace out at the end and the underslung frame brace near the middle, but didn't want to have to fight with them too much, so only sawed them partway through, leaving about 1/8" at the bottom of each, hoping that the sawcut's kerf would provide relief enough for them to move during the tweaking, but leaving the connected bit as a hinge and general locator.
Then I made a cut through the frame, right back at the joint of the rear wheel arch, leaving the hinge and saw kerf again. (I'd made a little simulation of the movement needed in CAD, and the kerf of the saw was just a little more than I needed, so perfect). Immediately, the frame started to behave and leveled out. I clamped it all down, checked for square and level again and was delighted to see how well it looked. Inspecting the saw kerfs showed some reduction in the width of the cut, but still had a little left, so no binding going on. Took extra precautions on the tack welding and got the thing put back together before lunch. It's very very close to perfect now and the voice has given grudging approval. The one with the Scots accent felt it necessary to mention that I'd always been a lazy lad, and that while, "Experience keeps a dear school, but a fool will learn from no other, I had finally come around at last". I said, "You stole that from Benjamin Franklin!" and, feeling righteous, cleaned up the tools and got some lunch.
And that's the real beauty of metalwork. You can almost always go back and fix it if you goof! Now on to making the front axle and steering.
- Bruce
"Personally I'm always ready to learn, although I do not always like being taught." - Winston Churchill

Smoky
Don Schmok
|
Aug 14, 2018 02:01 PM
Top Contributor
Joined 7 years ago
666 Posts
|
I didn’t even know you had to do all that! I used a carpenters square to make my frame, flopped it all over my bench to weld it. Welded the four corners, and only tacked everything else, then built my cart, fit the drivetrain, and drove it all around trying to break it.
It drove and braked straight, so I stripped it down, and welded everything up. Didn’t know you needed a flat table, and had to clamp it down. Then I built the body, and went to Tieton, twice.
Had a great time, so far nothing broke. Well, year one my throttle came apart, and so did my brake calliper, but my welding has held up, and I suppose it’s not twisted enough to notice.
Still having fun...
1929 Riley Bitsa
Forums 
Having trouble posting or changing forum settings?
Read the Forum Help (FAQ) or contact the webmaster
