

ForeCastle
How to trade Double-Top or Double-Bottom formation
by
, 09-22-2014 at 11:46 PM (1250 Views)
Talking Points:
- The Double-Top and Double-Bottom formation show multiple tests of support (or resistance) at a particular price level.
- Traders can look to trade subsequent tests of these price levels.
The Double-Top/Double-Bottom
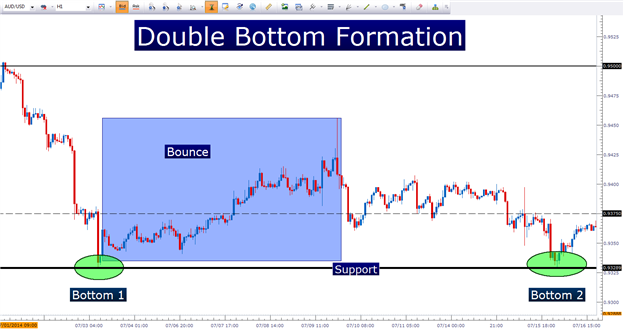
The Double-Top or Double-Bottom formation will occur when two separate moves bounce from a support or resistance level. This highlights that level as being especially strong, so that the next time price encounters this, traders may be able to look for a significant reaction.
In the below chart, we take a look at a recent double bottom formation in the AUDUSD pair:
Notice how price action has reacted to this level of support two different occasions. So the next time that we approach this level of established support, it could be reasonable to assume that some type of reaction may take place.
Imagine this support level as a theoretical line in the sand that can have the potential to pull additional buyers into the mix. But this isnt necessarily a completely bullish prospect because after this support level was defended, prices ended up coming right back down.
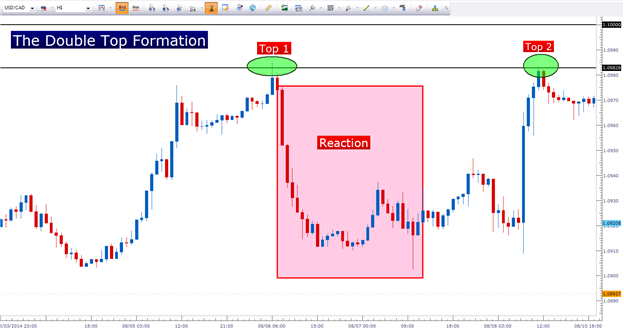
The exact opposite is true of resistance in the Double-Top formation:
Notice how this level of resistance on the chart has been validated twice by price action, as sellers have come in to push prices lower once this level was hit.
How to Trade the Double Top/Bottom Formation
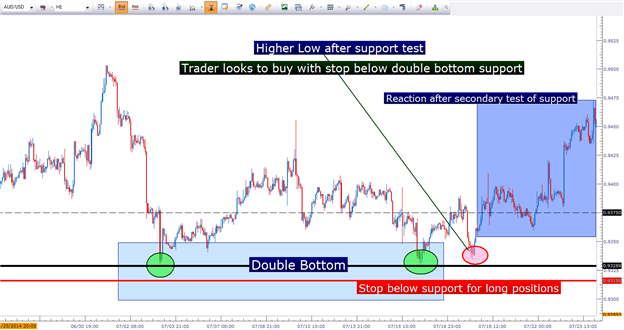
The default mannerism of trading the double bottom is to look for a bullish price reaction after the second test of support. So, using the same AUDUSD example we had looked at previously, we look at how a trader couldve approached this formation. After support was hit for a second time, the trader knows that there could potentially be a bullish bias coming into the market. After all, if buyers jumped in to protect the line-in-the-sand, they may do so again.
So after the double bottom was formed the trader waits: The trader waits for a higher-low to come into the market so that they can look to buy low, with a stop placed below the level of support at the double-bottom. This way, if the formation doesnt come to fruition, the loss can be mitigated; but if the formation does come through, then the trader can look to reap more upside than they had to put in to risk.
Trading the Double Bottom:
As you can see in the above setup, the real allure of trading the double top or double bottom is the potential to have a really strong support or resistance level to use for the basis of a positions risk management.
The exact opposite is true for the double top formation; in which the trader can look to sell lower highs, with a stop above resistance so that if that level holds, the trader can look to manage a profitable position but if the high point of resistance doesnt hold, the trader can look to exit the position while mitigating the loss.
--- Written by James Stanley
More...


Tags:
double bottom,
double top

- Categories
- Uncategorized
 Email Blog Entry
