This post explains How To Configure Forms Based Authentication FBA In SharePoint Server 2010 For Claims Based Web Applications Using IIS Server.
If you follow this example step by step, you will be able to setup mixed mode authentication with windows and Claims based or Forms Based Authentication in SharePoint Server 2010 without any errors.
1. Create Membership Provider DataBase In SQL Server 2008
Open windows explorer and navigate to C:\Windows\Microsoft.NET\Framework64\v2.0.50727 and double click on aspnet_regsql.exe to open ASP.NET Sql Server Setup Wizard.


Select configure sql server for application services option and click next

Enter Sql Server address, select windows authentication option and provide database name or leave it to default to create database with ASPNETDB name (i'm using ASPNETDB).

Click on finish to complete the setup wizard

2. Create New Login In Sql Server
Open Sql Server management studio, login with windows authentication and make sure sql server is configured for sql server and windows authentication mode
you can check this by right click on server name in object explorer > properties, select Security tab.
In object explorer right click on Security > new > Login

Provide new Login name, select sql server authentication, provide password and uncheck enforce password policy.
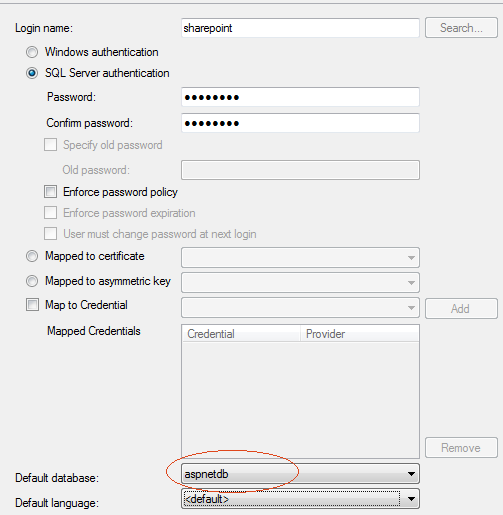
Click on OK to create new Sql User, I have created sharepoint as new login.
3. Assign permissions to use membership provider database
Provide this newly created login db_owner rights for Membership Provider DataBase (ASPNETDB in this example) we created in step 1.
Go to object explorer, expand DataBases > Expand ASPNETDB > Security > New > User

Enter login we created in earlier step (sharepoint) and check db_owner in database role membership section and click on OK.

4. Write Connection String In Machine.Config File
Navigate to C:\Windows\Microsoft.NET\Framework64\v2.0.50727\CONFIG and open machine.config file in notepad or visual studio.

Search for connectionstrings section and write your connection string with name LocalSqlServer to connect to membership database

5. Configure SharePoint Central Administration v4 In IIS Server
We need to configure SharePoint Central Administration application in IIS Server to use SQL membership Provider database we created in earlier steps
This is necessary for providing site collections administrator from membership Provider database when we create site collections.
5 a. Add Connection Strings
Open IIS Manager by typing inetmgr in search box in start menu
Select SharePoint Central Administration v4 and double click on Connection Strings

Click on Add in Actions pane on the right side and add two connection strings, one with same name as we added in machine.config file in step 4 (LocalSqlServer), another can be any name you like (i'll use SpConnection).

Provide your SQL Server Address, SQL membership Provider database name we created in step 1 (ASPNETDB)
Select the specify credentials options and click on set, enter user name and password of the login we created in step 2 (sharepoint) and click on OK to finish.

5b. Add Membership Provider
Select SharePoint Central Administration v4 and double click on Providers

Select .NET Users from dropdown and click on add from Actions pane

Select SqlMembershipProvider from type and give it any name ( i have used MembershipProvider)
Assign connection string in data section (SpConnection), Do provide application name or use /

5c. Add Role Provider
Select .NET Roles from dropdown and click on add from actions pane
Select SqlRoleProvider from type and name it RoleProvider
Provide connection string ( SpConnection ) and application name ( / ) and click on OK

6. Configure Security Token Service Application
Expand SharePoint Web Services in connections pane of IIS manager and select SecurityTokenServiceApplication

Add Connection Strings and providers for .NET Roles and .NET Users as mentioned in steps 5a, 5b and 5c
7. Create New Web Application
Open SharePoint Central Administration, click on Manage Web Applications

Click on New from the top bar

Select Claims Based Authentication option, provide website name and port ( Sharepoint - 80 )

Check the Enable Forms Based Authentication (FBA) checkbox and enter provider names we created in step 5a,b,c
Leave rest all options to default and click on OK

8. Configure Web Application In IIS Server
Open IIS manager (inetmgr) and select web application we created (Sharepoint - 80)

Add both connection strings as we did in step 5a

Add Membership and Role Providers as we did in step 5b and 5c


8a. Create Roles For Membership Database Through IIS
Select Sharepoint - 80 application from connections and Double click on .NET Roles

You will receive a warning, click on OK

Click on Set Default Provider from Actions pane and select RoleProvider (the one we added in step 5c)

Now we can create new role (Admin) by clicking on Add in actions pane

After creating Role it should display it, if not then check your connection string to database
8b. Create .NET Users
Select Sharepoint - 80 and double click on .NET Users

Ignore the warning and set default provider as MembershipProvider (the one we added in step 5b)

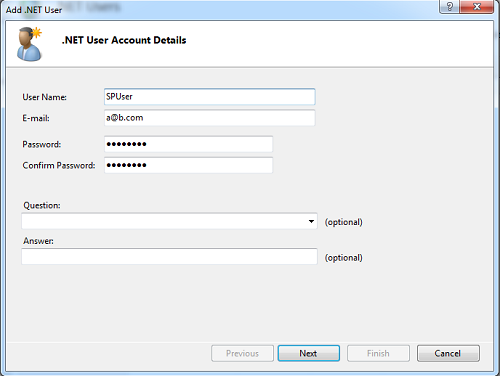
Create new user by clicking on Add in Actions pane, i have created SpUser as new user

It should display user we created, if not then troubleshoot your connection string to database
9. Reset Default Providers For Web Application (SharePoint - 80)
This step is very important for FBA to work, we need to reset c as default Provider for .NET Roles

Reset i as default provider for .NET Users

10. Create Site Collections
Open Sharepoint Central Administration and click on Create Site Collections
Select your web application ( Sharepoint - 80 ), Enter title and description and select a template

Assign SpUser as Primary Site Collection Administrator and click on check names to resolve it
After resolving it should be displayed as underline, or you can search for users in membership database by clicking on lookup icon


Click on ok to create site collection.
11. Browse Site
Enter site url in browser address bar (it' http://amitjain:80 for me)
 Select authentication type from dropdown (Forms Authentication) and provide credentials for user we created in step 8b (SpUser)


TroubleShooting
2. Check whether you are able to connect to membership provider database using connection string and login we created for sql server
3. Make sure you have set default providers as c and i for .NET roles and .NET Users in web application
4. Ensure web.config file for SharePoint Central Administration v4 have following entries
you can check it by right click on site name in IIS and select explore, now open web.config using either notepad or visual studio
5. Ensure web.config file for SecurityTokenServiceApplication have following entries
6. Make Sure web.config file for web application ( SharePoint - 80) have following entries
If you follow this example step by step, you will be able to setup mixed mode authentication with windows and Claims based or Forms Based Authentication in SharePoint Server 2010 without any errors.
1. Create Membership Provider DataBase In SQL Server 2008
Open windows explorer and navigate to C:\Windows\Microsoft.NET\Framework64\v2.0.50727 and double click on aspnet_regsql.exe to open ASP.NET Sql Server Setup Wizard.
Select configure sql server for application services option and click next
Enter Sql Server address, select windows authentication option and provide database name or leave it to default to create database with ASPNETDB name (i'm using ASPNETDB).
Click on finish to complete the setup wizard
2. Create New Login In Sql Server
Open Sql Server management studio, login with windows authentication and make sure sql server is configured for sql server and windows authentication mode
you can check this by right click on server name in object explorer > properties, select Security tab.
In object explorer right click on Security > new > Login
Provide new Login name, select sql server authentication, provide password and uncheck enforce password policy.
Click on OK to create new Sql User, I have created sharepoint as new login.
3. Assign permissions to use membership provider database
Provide this newly created login db_owner rights for Membership Provider DataBase (ASPNETDB in this example) we created in step 1.
Go to object explorer, expand DataBases > Expand ASPNETDB > Security > New > User
Enter login we created in earlier step (sharepoint) and check db_owner in database role membership section and click on OK.
4. Write Connection String In Machine.Config File
Navigate to C:\Windows\Microsoft.NET\Framework64\v2.0.50727\CONFIG and open machine.config file in notepad or visual studio.
Search for connectionstrings section and write your connection string with name LocalSqlServer to connect to membership database
1: <connectionStrings>
2: <add name="LocalSqlServer" connectionString="data
3: source=AMITJAIN\SQLEXPRESS;Integrated Security=SSPI;
4: Initial Catalog=aspnetdb;User Instance=true"
5: providerName="System.Data.SqlClient"/>
6: </connectionStrings>
5. Configure SharePoint Central Administration v4 In IIS Server
We need to configure SharePoint Central Administration application in IIS Server to use SQL membership Provider database we created in earlier steps
This is necessary for providing site collections administrator from membership Provider database when we create site collections.
5 a. Add Connection Strings
Open IIS Manager by typing inetmgr in search box in start menu
Select SharePoint Central Administration v4 and double click on Connection Strings
Click on Add in Actions pane on the right side and add two connection strings, one with same name as we added in machine.config file in step 4 (LocalSqlServer), another can be any name you like (i'll use SpConnection).
Provide your SQL Server Address, SQL membership Provider database name we created in step 1 (ASPNETDB)
Select the specify credentials options and click on set, enter user name and password of the login we created in step 2 (sharepoint) and click on OK to finish.
5b. Add Membership Provider
Select SharePoint Central Administration v4 and double click on Providers
Select .NET Users from dropdown and click on add from Actions pane
Select SqlMembershipProvider from type and give it any name ( i have used MembershipProvider)
Assign connection string in data section (SpConnection), Do provide application name or use /
5c. Add Role Provider
Select .NET Roles from dropdown and click on add from actions pane
Select SqlRoleProvider from type and name it RoleProvider
Provide connection string ( SpConnection ) and application name ( / ) and click on OK
6. Configure Security Token Service Application
Expand SharePoint Web Services in connections pane of IIS manager and select SecurityTokenServiceApplication
Add Connection Strings and providers for .NET Roles and .NET Users as mentioned in steps 5a, 5b and 5c
7. Create New Web Application
Open SharePoint Central Administration, click on Manage Web Applications
Click on New from the top bar
Select Claims Based Authentication option, provide website name and port ( Sharepoint - 80 )
Check the Enable Forms Based Authentication (FBA) checkbox and enter provider names we created in step 5a,b,c
Leave rest all options to default and click on OK
8. Configure Web Application In IIS Server
Open IIS manager (inetmgr) and select web application we created (Sharepoint - 80)
Add both connection strings as we did in step 5a
Add Membership and Role Providers as we did in step 5b and 5c
8a. Create Roles For Membership Database Through IIS
Select Sharepoint - 80 application from connections and Double click on .NET Roles
You will receive a warning, click on OK
Click on Set Default Provider from Actions pane and select RoleProvider (the one we added in step 5c)
Now we can create new role (Admin) by clicking on Add in actions pane
After creating Role it should display it, if not then check your connection string to database
8b. Create .NET Users
Select Sharepoint - 80 and double click on .NET Users
Ignore the warning and set default provider as MembershipProvider (the one we added in step 5b)
Create new user by clicking on Add in Actions pane, i have created SpUser as new user
It should display user we created, if not then troubleshoot your connection string to database
9. Reset Default Providers For Web Application (SharePoint - 80)
This step is very important for FBA to work, we need to reset c as default Provider for .NET Roles
Reset i as default provider for .NET Users
10. Create Site Collections
Open Sharepoint Central Administration and click on Create Site Collections
Select your web application ( Sharepoint - 80 ), Enter title and description and select a template
Assign SpUser as Primary Site Collection Administrator and click on check names to resolve it
After resolving it should be displayed as underline, or you can search for users in membership database by clicking on lookup icon
Click on ok to create site collection.
11. Browse Site
Enter site url in browser address bar (it' http://amitjain:80 for me)
TroubleShooting
1. Make sure you have provided Application name while adding providers in step 5b and 5c, / works in most scenarios
2. Check whether you are able to connect to membership provider database using connection string and login we created for sql server
3. Make sure you have set default providers as c and i for .NET roles and .NET Users in web application
4. Ensure web.config file for SharePoint Central Administration v4 have following entries
you can check it by right click on site name in IIS and select explore, now open web.config using either notepad or visual studio
<membership>
<providers>
<add name="MembershipProvider" type="System.Web.Security.SqlMembershipProvider, System.Web, Version=2.0.0.0, Culture=neutral, PublicKeyToken=b03f5f7f11d50a3a" applicationName="/" connectionStringName="SpConnection" enablePasswordReset="false" enablePasswordRetrieval="false" passwordFormat="Clear" requiresQuestionAndAnswer="false" requiresUniqueEmail="false" />
</providers>
</membership>
<roleManager>
<providers>
<add name="RoleProvider" type="System.Web.Security.SqlRoleProvider, System.Web, Version=2.0.0.0, Culture=neutral, PublicKeyToken=b03f5f7f11d50a3a" applicationName="/" connectionStringName="SpConnection" />
</providers>
</roleManager>
</system.web>
<connectionStrings>
<add connectionString="Server=AMITJAIN\SQLEXPRESS;Database=aspnetdb;User ID=sharepoint;Password=password" name="LocalSqlServer" />
<add connectionString="Server=AMITJAIN\SQLEXPRESS;Database=aspnetdb;User ID=sharepoint;Password=password" name="SpConnection" />
</connectionStrings>
</configuration>
5. Ensure web.config file for SecurityTokenServiceApplication have following entries
<connectionStrings>
<add connectionString="Server=AMITJAIN\SQLEXPRESS;Database=aspnetdb;User ID=sharepoint;Password=password" name="LocalSqlServer" />
<add connectionString="Server=AMITJAIN\SQLEXPRESS;Database=aspnetdb;User ID=sharepoint;Password=password" name="SpConnection" />
</connectionStrings>
<system.web>
<membership>
<providers>
<add name="MembershipProvider" type="System.Web.Security.SqlMembershipProvider, System.Web, Version=2.0.0.0, Culture=neutral, PublicKeyToken=b03f5f7f11d50a3a" applicationName="/" connectionStringName="SpConnection" enablePasswordReset="false" enablePasswordRetrieval="false" passwordFormat="Clear" requiresQuestionAndAnswer="false" requiresUniqueEmail="false" />
</providers>
</membership>
<roleManager>
<providers>
<add name="RoleProvider" type="System.Web.Security.SqlRoleProvider, System.Web, Version=2.0.0.0, Culture=neutral, PublicKeyToken=b03f5f7f11d50a3a" applicationName="/" connectionStringName="SpConnection" />
</providers>
</roleManager>
</system.web>
6. Make Sure web.config file for web application ( SharePoint - 80) have following entries
<membership defaultProvider="i">
<providers>
<add name="i" type="Microsoft.SharePoint.Administration.Claims.SPClaimsAuthMembershipProvider, Microsoft.SharePoint, Version=14.0.0.0, Culture=neutral, PublicKeyToken=71e9bce111e9429c" />
<add name="MembershipProvider" type="System.Web.Security.SqlMembershipProvider, System.Web, Version=2.0.0.0, Culture=neutral, PublicKeyToken=b03f5f7f11d50a3a" applicationName="/" connectionStringName="SpConnection" enablePasswordReset="false" enablePasswordRetrieval="false" passwordFormat="Clear" requiresQuestionAndAnswer="false" requiresUniqueEmail="false" />
</providers>
</membership>
<roleManager cacheRolesInCookie="false" defaultProvider="c" enabled="true">
<providers>
<add name="c" type="Microsoft.SharePoint.Administration.Claims.SPClaimsAuthRoleProvider, Microsoft.SharePoint, Version=14.0.0.0, Culture=neutral, PublicKeyToken=71e9bce111e9429c" />
<add name="RoleProvider" type="System.Web.Security.SqlRoleProvider, System.Web, Version=2.0.0.0, Culture=neutral, PublicKeyToken=b03f5f7f11d50a3a" applicationName="/" connectionStringName="SpConnection" />
</providers>
</roleManager>
<connectionStrings>
<add connectionString="Server=AMITJAIN\SQLEXPRESS;Database=aspnetdb;User ID=sharepoint;Password=password" name="LocalSqlServer" />
<add connectionString="Server=AMITJAIN\SQLEXPRESS;Database=aspnetdb;User ID=sharepoint;Password=password" name="SpConnection" />
</connectionStrings>
If you like this post than join us or share

4 comments:
One thing that might be worth explicitly mentioning is that the LocalSqlServer connection string will already exist in all of the Connection String settings you go into. This *does* need to be changed to have the same connection string as "spconnection".
@sim: thanks a lot for taking your time to write, as you see i have already mentioned about it in step 4
I am getting error :
Server Error in '/' Application.
Runtime Error
Description: An application error occurred on the server. The current custom error settings for this application prevent the details of the application error from being viewed.
Details: To enable the details of this specific error message to be viewable on the local server machine, please create a tag within a "web.config" configuration file located in the root directory of the current web application. This tag should then have its "mode" attribute set to "RemoteOnly". To enable the details to be viewable on remote machines, please set "mode" to "Off".
Notes: The current error page you are seeing can be replaced by a custom error page by modifying the "defaultRedirect" attribute of the application's configuration tag to point to a custom error page URL.
@Rajiv Kumar: did you take steps exactly as i mentioned in the article above and did you followed troubleshooting section of this article ?
Post a Comment